# Slidemount C4 DIY Kit Description
\*Disclaimer: This is a guide only.
**This installation guide applies to the Side Slidemount for C4 DIY Starter Kit**
## **Description**
To support users with steep windshields and those who love creating custom setups, we are making the design files for our latest SlideMount C4 Source Available! If you are an advanced 3D printing enthusiast looking to modify and print your own perfect mount for personal use, this is the ideal project for you. To make the assembly process completely seamless, we are now offering a complete DIY Hardware Starter Kit. It gives you the foundational parts you need to start building, so you can take our Source Available design and create a custom mount with limitless possibilities.
### Link for 3D printed slidemount C4 File
**Share Your Custom Designs!**\
Have you modified the CAD files or designed a unique mount for your specific vehicle? We’d love to see it! Feel free to create a pull request on our repository or email your design files directly to us. We will share your creations with the community so other users can benefit from your awesome work.
### Highlight
We engineered this mount to solve the most common issues users face:
* **100% Magnet-Free (Press-to-Unlock)**: We ditched the magnets for a rock-solid mechanical lock. This means zero magnetic interference and no rattling.
* **Zero Fan Interference**: The design is specifically contoured to ensure the Comma 4's cooling fan is not affected.
* **Bi-Directional Sliding**: You can slide the device on and off from two different directions, making it much easier to handle in vehicles with tight windshield angles.
* **CNC Aluminum Bracket**: Because the new C4 mounting slot is so much smaller, plastic parts just don't offer enough rigidity. We upgraded the core sliding bracket to CNC-machined aluminum to guarantee a rock-solid, vibration-free connection.
### What is included?
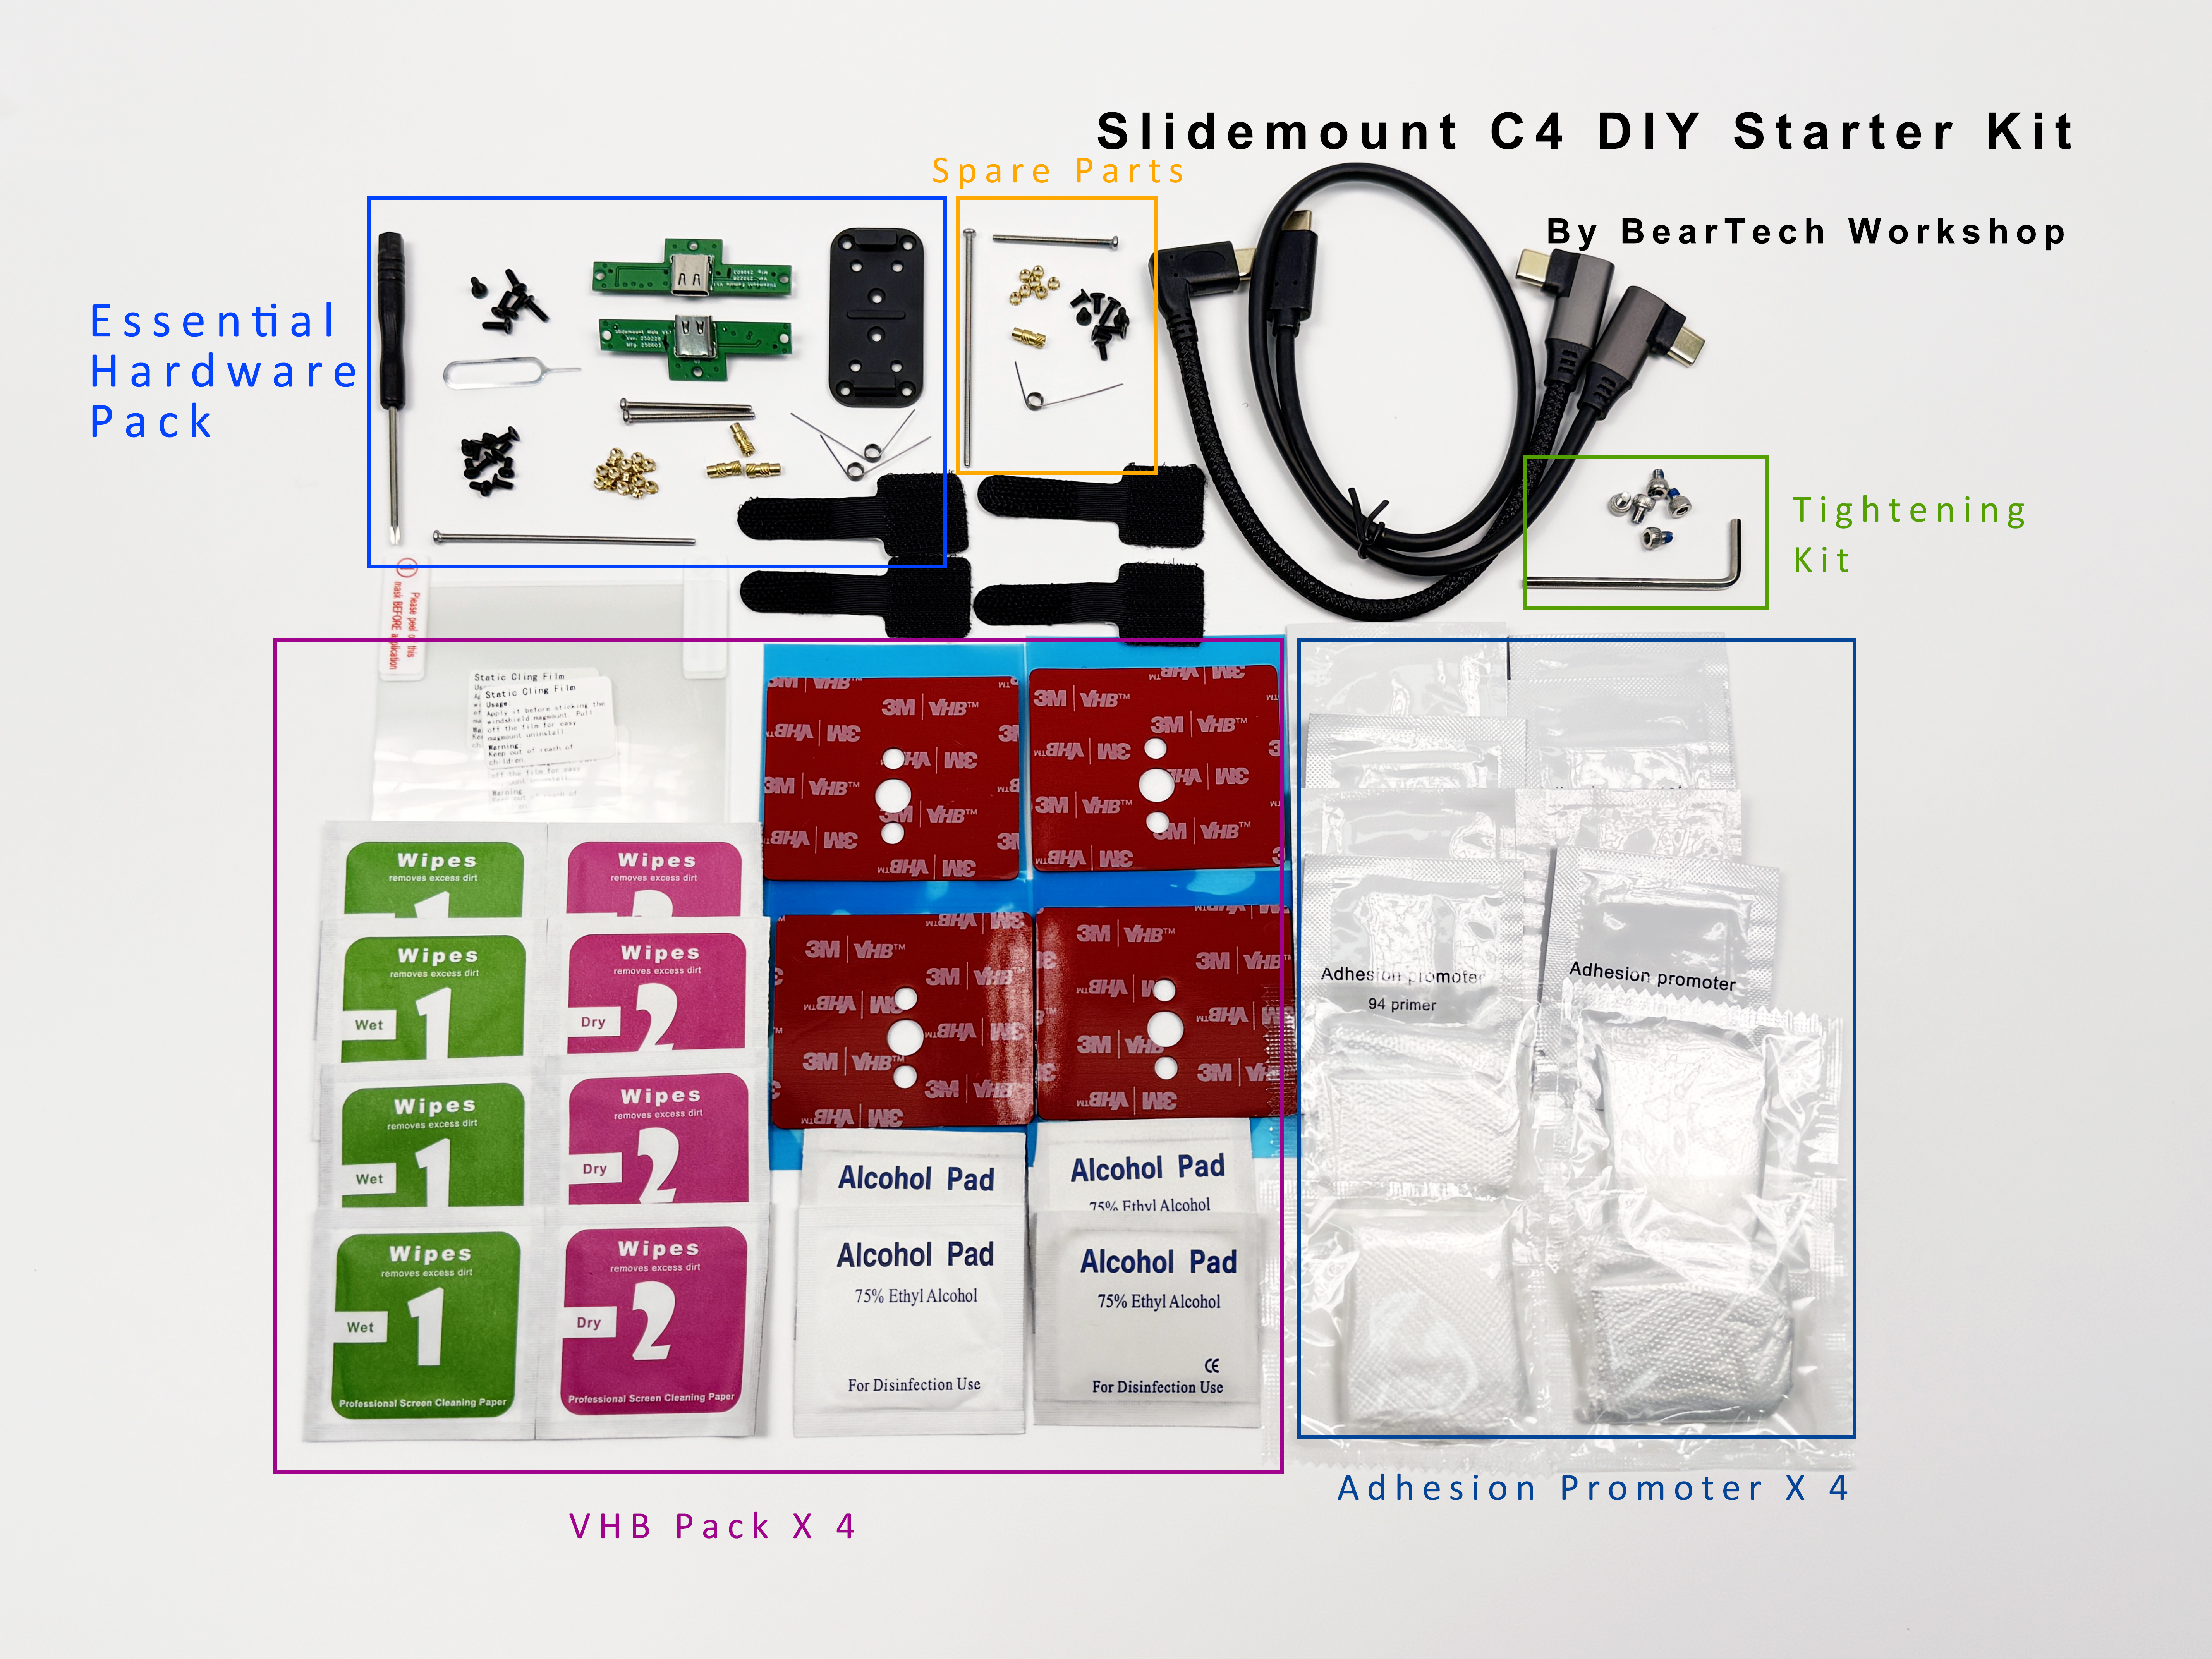
The SlideMount C4 DIY Starter Kit includes everything you need to assemble and install your custom mount, meticulously organized to make your build as smooth as possible. Inside the package, you will find:
* **Essential Hardware Pack**: The core components for your build, including the male and female PCBs, an aluminum C4 device bracket, a mini screwdriver, tension springs, brass heat-set inserts, standoffs, and all the necessary structural screws.
* **Cables:** One 13cm Right Angle Head Type-C to Right Angle Head Type-C Cable (Connect the comma device and the Device Side Mount), one 45cm Right Angle Head Type-C to Stright Type-C Cable
* **Spare Parts**: A backup supply of extra screws, heat-set inserts, and a tension spring, giving you peace of mind in case a tiny piece goes missing during assembly.
* **Tightening Kit**: An Allen wrench (hex key) accompanied by five screws.
* V**HB Packs (x4)**: Everything needed for a perfect windshield application, featuring custom-cut 3M VHB tape, static cling film, wet/dry screen cleaning wipes, and alcohol pads.
* **Adhesion Promoters (x4)**: Packets of 94 Primer to ensure maximum bond strength between the VHB tape and your windshield mount.
* **Cable Management Kit**: Four hook-and-loop cable ties to keep your final setup clean and organized.
### Printing Material
Since the SlideMount will sit on your windshield directly under the hot sun, material choice is critical.
* Our Top Recommendation: We strongly recommend printing your casing in **ASA-CF (Carbon Fiber reinforced ASA)**. We use this exact material for our pre-built SlideMounts because it offers the absolute best durability, UV resistance, and heat deflection. *(*[*Need filament? You can grab the exact ASA-CF material we use directly from our store*](https://docs.innoisle.com/materials/3d-printing-filaments)*).*
* **Alternative Materials**: You can also successfully print your own parts using standard ASA, ABS, PA (Nylon), PC (Polycarbonate), or PETG. Any of these materials blended with Carbon Fiber (-CF) or Glass Fiber (-GF) will also work excellently for added rigidity.
* Note: We **do not recommend standard PLA**, as it will warp in the heat of a parked car.
***
## Installation Guide
***
### **Set Screw Warning:**
**\*Over-tightening the set screw could break your Comma Device/ Slidemount Brackets**
**Set screw is required for Slidemount**: \
\- Set screw is NOT Pre-Installed for Side Slidemount\
\- After attaching the mount to device, tighten the pre-install set screws at the left and right side of the Slidemount.\
\- Tighten it **just enough** that you can't move the Slidemount. \
\- **Do not over-tighten it**, as the screw is small and is only intended to prevent movement. \
\- Over-tightening it will cause the **breakage of the mounting bracket or your device bracket**.
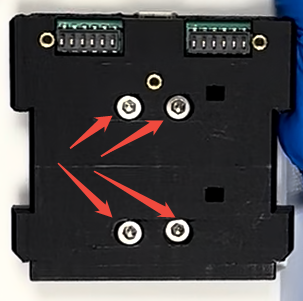
This is an example of 4 set screws installed for the C4 Side Slidemount Device side
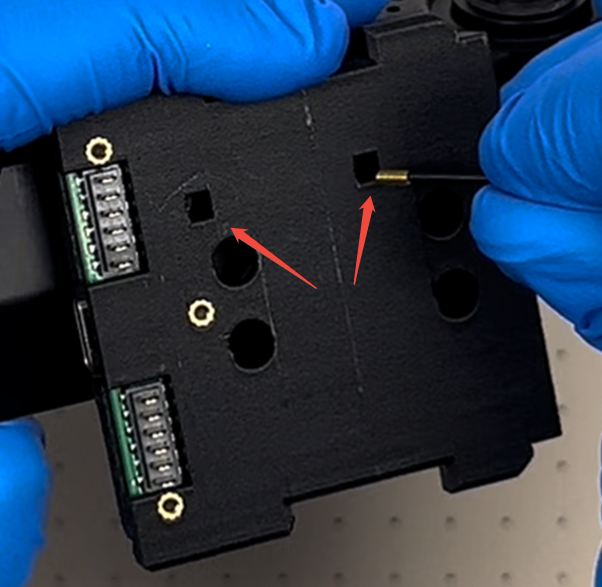
This is an example of installiong 2 set screws for the C3 Device-Side Mount (Compatible with C4 Base)
### How to install on your windshield?
#### Important: Prepare your VHB:
1. All slidemount already come with **pre-applied VHB**. \
If you would like to **redo the VHB**, then please follow the steps to prep it.\
Please make sure you **apply the adhesion promoter** before applying the VHB.
2. Warning: Apply the VHB tape to the slidemount, first before you stick it on the windshield. And apply the VHB in warm temp.\
If you are reapplying the VHB tape, Clean the surface with isopropyl alcohol and ensure that no residue remains.
3. **(Important)** The ideal application temperature for VHB tape is above 70°F (21°C), with a minimum requirement of 50°F (10°C).
If the temperature is below this minimum, please gently warm the application surface before and after attaching the MagMount. Exercise caution when heating the area to avoid overheating or damaging the surface.
Please note that VHB tape requires these temperatures to cure properly. Allow the adhesive to cure for at least 24 hours (or 1.5 times the standard curing time recommended by 3M). Refer to the 3M datasheet snippet below for recommended bond times.
4. 
5. Take the Windshield Side Mount.
6. Wipe the back of the Windshield Side Mount with the IPA wipe.
7. Apply **adhesion promoter to every surface (except on glass)** that the VHB is going to stick to and let it dry. (If you have windshield tint, please try it on a small area first, some tint does not do well with the adhesion promoter)
8. Apply VHB tape to the Windshield Side Mount.
9. **Clamp or use weight** on the complete slidemount for **at least 5 hours** so VHB makes perfect contact to the surface. **Every VHB-connected surface** needs to be clamped. (The complete slidemount here means slidemount with angle wedges and VHB or slidemount with mount adapter sticked together. )
***
### Slidemount C4 Installation Guide
We have released an updated **non-magnetic version of the SlideMount**. The installation process remains identical to the previous magnetic version; the only difference is the new "**Press to Unlock**" mechanism.
#### New Mechanism Demo:
{% embed url="" %}
#### Full Installation Guide:
{% embed url="" %}
***
## Warnings and Cautions
1. Magnets:
1. Warning: The strong magnets in this product can cause severe pinching injuries. Always handle with care and avoid placing fingers near the magnetic connection points. Do not play with the magnets, as they can attract unexpectedly and lead to injury.
2. Caution: Keep all magnetic components away from electronic devices, credit cards, and other magnetic-sensitive materials. Failure to do so may result in damage to these items.
3. Caution: Store the device away from children and pets to prevent accidental injury or ingestion.
2. Adhesion Promoter:
1. Warning: Keep out of reach of children. Always use provided gloves during application. This product is highly flammable; keep away from heat sources and open flames. Causes serious eye irritation and may result in an allergic skin reaction. It may be fatal if swallowed and enters airways. May cause drowsiness or dizziness, and has potential reproductive effects. Long-term exposure may damage sensory organs and the nervous system.
3. Type-C Cables:
1. Warning: Keep out of reach of children. Do not pull the cable with excessive force, and ensure the cable is firmly attached to prevent damage.
4. VHB Tape:
1. Warning: Keep out of reach of children.
2. Caution: Ensure the bonding surface is clean and dry before applying the VHB tape for optimal adhesion.
5. Thread Locker:
1. Warning: Keep out of reach of children.
2. Hazard Statements: Causes serious eye irritation and may cause an allergic skin reaction.
6. Static Cling Film:
1. Warning: Keep out of reach of children.
#### General Safety
* Caution: Always follow the installation instructions carefully. Improper installation may lead to device malfunction, damage to your vehicle, or personal injury.
* Caution: Ensure that the mount is securely attached before driving. Regularly check for any signs of wear or loosening.
* Warning: Do not overload the mount or exceed the weight limit of the device. This could cause the mount to detach unexpectedly while in use.
* Caution: Avoid using the device in extreme weather conditions (e.g., excessive heat or cold) that may affect its performance and adhesion.
* Caution: Be aware of your surroundings when installing or removing the mount to prevent accidents or injuries.
#### Liability Disclaimer
Warning: The manufacturer is not responsible for any injuries, damages, or malfunctions resulting from improper installation, use, or handling of this product. Use at your own risk.
#### **License:**
This work is licensed under a [Creative Commons Attribution-NonCommercial-ShareAlike 4.0 International License](http://creativecommons.org/licenses/by-nc-sa/4.0/).